Austin Gallery
DIY & HomeJune 28, 2026Updated June 28, 202622 min read

How to Refinish Old Furniture: The Complete Kit & Step-by-Step

Flip a tired chair or a $30 thrift dresser to gallery quality and resell it for a profit — every tool you need, woven into the full step-by-step process, beginning to end.

By Justin Park · How we research

There is no better flip in DIY than a piece of furniture. A free curbside dresser or a $30 thrift-store chair can become a $300 showpiece — and the skills look far harder than they are. Do it well and you've got a sustainable hobby that pays for itself, plus a genuine side hustle: refinished furniture sells fast and for real money.

This is the complete kit and the complete process. Below you'll find the exact tools and products that take a piece from beat-up to gallery quality — strip, repair, sand, finish (stain or paint), re-hardware, reupholster, protect — each one a real, current Amazon pick. And woven between them is the full step-by-step, so you know exactly what to do and when. By the end you'll be able to rehab anything you find, then list it for sale (and if you're in Austin, come show us). Let's bring something back.

In a Hurry?

The 4 picks that cover most readers. Tap to read the full review or buy direct.

Step 1: Strip

Citristrip Stripping Gel

Citristrip Stripping Gel

$33.35

Take it back to bare wood, fume-free.

Step 5: Sand

DEWALT Orbital Sander

DEWALT Orbital Sander

$93.49

The power tool that makes refinishing easy.

Step 6: Transform

Rust-Oleum Chalked Paint

Rust-Oleum Chalked Paint

$24.57

One-coat, minimal-prep transformation.

Step 8: Reupholster

Arrow Electric Staple Gun

Arrow Electric Staple Gun

$49.99

Recover a chair seat in 30 minutes.

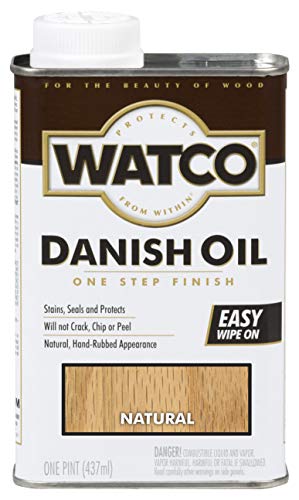
Best Stripper for BeginnersStep 1 Pick

Use

Removes old varnish/paint

Dwell time

Up to 24 hrs

Smell

Low-odor

Best for

Going back to bare wood

Pros

  • Clings to vertical surfaces — no runny mess
  • Stays active for hours, so it actually works
  • Far less harsh than old-school strippers
  • Beginner-proof

Cons

  • Still wear a respirator + gloves
  • Needs a dwell time — not instant
Every refinish-to-wood project starts here. Brush on a thick coat, wait 15–30 minutes until the old finish bubbles, then scrape it off with the grain. Citristrip is the one beginners reach for because it stays workable for hours and doesn't fill the garage with fumes. The single product that makes stripping un-scary.

Step 1 Pick

The friendliest, most forgiving way to strip an old finish back to bare, ready-to-refinish wood.

Check Price on Amazon →$33.35 · Citristrip
Best Wood Glue

Type

Waterproof PVA

Open time

Extended

Bond

Stronger than wood

Best for

Loose joints & veneer

Pros

  • Bond is stronger than the wood itself
  • Waterproof and longer working time
  • Fixes the #1 issue — wobbly joints
  • A few dollars; lasts dozens of projects

Cons

  • Clamp it (an unclamped joint is weak)
  • Wipe squeeze-out before it dries
Most 'broken' furniture just has loose joints, and Titebond III fixes them permanently: work it into the joint, clamp overnight, done. It's the repair that turns a wobbly curb-find reject into a solid, sellable piece. Pair it with clamps and stainable filler for dents and old screw holes.
Check Price on Amazon →$9.58 · Titebond
Best SanderOur Pick

Type

Random orbital

Power

20V cordless

Pad

Hook-and-loop

Best for

Flat surfaces, fast

Pros

  • Swirl-free random-orbit action
  • Cordless freedom around the piece
  • Low vibration — comfortable for long sessions
  • Pad changes in seconds

Cons

  • Battery sold separately (tool-only)
  • Hand-sand the curves
Sanding is where a refinish is won or lost, and a random-orbital sander makes it fast and swirl-free. The DeWalt is the one that makes the worst part of the job genuinely pleasant — cordless, smooth, and quick to swap grits. Work through 80 → 120 → 180–220, then tack-cloth the dust. This is the power tool worth owning.

Our Pick

The single best tool investment in furniture refinishing — turns hours of drudgery into a quick, even job.

Best Wood StainRefinish Route

Type

Oil-based penetrating

Shades

Natural → dark walnut

Apply

Wipe or brush

Best for

Showing off grain

Pros

  • Every shade from natural to espresso
  • Forgiving — wipe on, wait, wipe off
  • The stain most pros default to
  • Pairs with any topcoat

Cons

  • Condition blotch-prone woods first
  • Always test on a hidden spot
If your piece has good grain, staining shows it off and holds the most resale value. Minwax is the classic for a reason: wipe it on, let it sit (longer = darker), wipe off the excess. Condition softwoods first with pre-stain conditioner, then seal with poly or oil. The heart of the refinish-to-wood route.
Check Price on Amazon →See price · Minwax
Easiest Durable Topcoat

Type

Wipe-on polyurethane

Finish

Satin

Coats

2–3 thin

Best for

Tabletops & high-wear

Pros

  • Wipes on with a rag — no brush marks ever
  • Hard, water-resistant protective film
  • The most foolproof poly there is
  • Great for surfaces that take daily wear

Cons

  • Multiple thin coats needed
  • Let each coat cure
Bare stained wood needs protection, and wipe-on poly is the beginner-proof way to get a hard, professional finish: wipe a thin coat with a rag, let it dry, lightly scuff, repeat. No brush marks, no drips. For tabletops, desks, and anything with daily use, this is the topcoat.

Austin Art Insider

Free weekly guide to galleries, exhibitions & collecting in Austin.

Best Natural Oil Finish

Type

Penetrating oil

Look

Matte, in-the-wood

Apply

Wipe on/off

Best for

Walnut, teak, oak décor

Pros

  • Enriches grain with a soft, hand-rubbed glow
  • Dead easy to apply and to repair later
  • Beautiful low-sheen, natural look
  • Forgiving for first-timers

Cons

  • Less protective than poly
  • Re-apply occasionally
For a natural, matte, 'feel-the-wood' finish, Danish oil is gorgeous and almost impossible to mess up — flood it on, let it soak, wipe off. It's the connoisseur's look for display pieces, dressers, and shelving. Choose poly instead for surfaces that take heavy daily wear.
Best Paint for FurnitureBeginner-Friendly

Type

Chalk / ultra-matte

Prep

Minimal (clean + scuff)

Coverage

1–2 coats

Best for

Plain or damaged pieces

Pros

  • Grips almost anything with little prep
  • Self-levels and dries to a chic matte
  • One-to-two-coat coverage
  • The fastest dramatic transformation

Cons

  • Porous — must be sealed (wax/poly)
  • Brush quality shows
If the wood is plain, veneered, or banged-up, paint is the move — and chalk paint is the beginner's secret weapon. It bonds with just a clean and a light scuff-sand, brushes on forgivingly, and dries to a beautiful matte finish in one or two coats. Seal it with wax or a clear topcoat and you've transformed a $20 find into a showpiece.

Beginner-Friendly

The most forgiving, highest-impact way to flip a piece — minimal prep, maximum transformation.

Check Price on Amazon →$24.57 · Rust-Oleum
Best for a Pro, Sprayed Finish

Type

Handheld HVLP

Sprays

Paint, stain, poly

Finish

Factory-smooth

Best for

Cabinets & dressers

Pros

  • Eliminates brush marks entirely
  • Sprays chalk paint, latex, stain, and poly
  • Makes flips look professionally finished
  • Fast on big flat surfaces

Cons

  • Setup + cleanup time
  • Needs masking/overspray control
The leap from 'nice DIY' to 'how is this homemade?' is a sprayed finish. The Wagner FLEXiO lays paint, stain, or poly down glass-smooth with no brush marks — transformative on cabinet doors and dresser fronts. It's the upgrade serious flippers make once they're hooked.
Check Price on Amazon →$149.98 · Wagner
Best Upholstery ToolReupholster Pick

Type

Electric stapler

Use

Seats & fabric

Includes

3,750 staples

Best for

Drop-in seats

Pros

  • Drives staples flush through fabric + wood effortlessly
  • Way easier on your hand than a manual gun
  • Perfect for chair seats and headboards
  • Comes loaded with staples

Cons

  • Corded
  • Mind your fingers
Reupholstering a drop-in chair seat is the perfect first upholstery project — often 30 minutes — and an electric staple gun makes it painless. Pull the old staples, layer fresh foam and batting, pull your new fabric taut, and staple from the center of each side outward. The Arrow drives every staple flush without wrecking your hand.
Best Finishing TouchFinal Step

Type

Beeswax + orange oil

Use

Final polish

Finish

Soft sheen

Best for

The last 5%

Pros

  • Revives wood and adds a warm, pro sheen
  • The detail that reads 'gallery quality'
  • Easy wipe-on, buff-off
  • A little goes a long way

Cons

  • For oiled/waxed finishes, not over poly
  • Reapply over time
The last 5% is what separates 'DIY' from 'gallery quality.' Howard Feed-N-Wax feeds the wood and leaves a soft, hand-rubbed glow that makes a finished piece photograph like a showroom item. Add felt pads to the feet, give everything a final buff, and you're ready to sell. Details close sales.

Head-to-Head

How the top picks compare

The two decisions that make or break a flip.

Refinish (Stain) vs. Paint

The first and biggest decision — driven by your wood.

Stain & Seal

Minwax

Winner

Stain & Seal

Shows off real wood grain, holds value

From ~$13
Check Price →
Chalk Paint

Rust-Oleum

Chalk Paint

Forgiving, any color, hides flaws

$24.57
Check Price →

Our verdict

Winner: Minwax Stain & Seal. It's not really preference — it's the piece. Solid wood with beautiful grain (oak, walnut, teak) should be stripped and stained or oiled; that grain is the value, and painting over it is a waste. Plain, veneered, patched, or damaged wood is exactly what paint is for — it's forgiving, hits any color, and still sells beautifully. Let the wood decide. (Many flippers do both: stain the tops, paint the bases.)

Buy the Minwax

Refinish/stain if the piece is solid wood with grain worth showing.

Buy the Rust-Oleum

Paint if the wood is plain, veneered, or damaged (and for any color you want).

Danish Oil vs. Wipe-On Poly

The topcoat question for refinished wood.

Danish Oil

Watco

Danish Oil

Natural matte, in-the-wood look

$14.98
Check Price →
Wipe-On Poly

Minwax

Winner

Wipe-On Poly

Hard, water-resistant protection

$19.24
Check Price →

Our verdict

Winner: Minwax Wipe-On Poly. Both wipe on easily, but they protect differently. Danish oil gives a gorgeous natural, matte look and is dead simple to repair — perfect for dressers, shelving, and display pieces. Wipe-on poly builds a harder, water-resistant film that survives daily wear — the right call for tabletops, desks, and anything that gets used hard. For most high-use furniture, poly; for low-wear beauty, oil.

Buy the Watco

Choose Danish oil for a natural matte look on low-wear, decorative pieces.

Buy the Minwax

Choose wipe-on poly for durable, water-resistant protection on tables and high-use surfaces.

How we
chose

We chose every product here the way a working furniture flipper would — for results, value, and durability across many projects — and verified each is genuinely available on Amazon with live pricing and real product imagery.

  • Organized by the actual process — safety → strip → repair → sand → finish → hardware → upholstery → protect, so you buy exactly what your piece needs.
  • Beginner-proof picks first — low-odor stripper, wipe-on finishes, chalk paint, and an electric stapler, because the easiest path is the one you'll actually finish.
  • Two finishing routes, honestly compared — refinish-to-wood (stain + seal) for good grain, paint for plain or damaged pieces. We tell you which your piece wants.
  • Built to resell — the goal isn't just 'fixed up,' it's gallery quality that photographs and sells.

Austin Gallery may earn a commission from purchases made through links on this page, at no cost to you. It never changes our picks — these are the tools we'd put in our own shop.

Share this guide

Share

Common Questions

Frequently Asked Questions

The Payoff

Photograph it, price it, sell it

A great refinish deserves a great listing — and good photos sell pieces faster than anything else. Shoot in soft natural daylight against a clean background, capture every angle plus close-ups of the grain or paint, include one styled-in-a-room shot, and always list exact dimensions. Be honest about flaws; trust closes sales. Price by checking sold (not just listed) comparables in your area — don't underprice good work.

  • Fast & fee-free (local): Facebook Marketplace and Nextdoor — best for larger pickup pieces.
  • Higher-end design buyers: Chairish and 1stDibs (they take a commission, but reach collectors).
  • Smaller painted pieces: Etsy, plus local vintage markets and flea markets for weekend sales.
  • Sell outright: services like Kaiyo buy quality used furniture without the listing hassle.
  • In Austin? Come say hi. We love seeing what local makers create — reach out and we'll point you toward the best Austin markets, fairs, and consignment shops to sell your refinished pieces.

The Full Guide

The Complete Furniture-Refinishing Kit, by Step

Every tool and product we recommend, organized by the stage you'll use it. Jump to what your piece needs.

Have art
to sell?

Austin Gallery specializes in selling inherited art, estate collections, and fine art with zero upfront fees. Get a free evaluation today.