Austin Gallery

Studio & Tools

Best Embroidery Kits & Supplies (2026): The Complete Beginner's Setup

Embroidery is portable, meditative, and cheap to start — and forgiving to learn if you begin with the right kit and know whether you want freestyle embroidery or counted cross-stitch. We assembled everything, from a stitch-teaching kit to a hands-free stand, in the order you'll use it.

By Justin ParkUpdated June 4, 202615 min readHow we research

Embroidery is having a huge revival — it's portable, meditative, cheap to start, and a finished piece looks genuinely impressive in a hoop on the wall. It's also one of the most forgiving crafts to begin, if you start with the right kit and understand one thing up front: whether you want freestyle surface embroidery or counted cross-stitch, because that decision shapes your fabric, needles, and patterns.

This is the complete beginner's setup — a kit to learn on, then the hoops, floss, needles, fabric, scissors, and a stand to keep going — in the order you'll use it. Start with an all-in-one kit, or build exactly the kit you want (roughly $50–$90 from scratch). Every link goes to Amazon with our affiliate tag — we earn a small commission, at no cost to you, when you buy through us. And read the embroidery-vs-cross-stitch note: it's the one thing worth getting straight before you buy fabric.

In a Hurry?

The 3 picks that cover most readers. Tap to read the full review or buy direct.

Best Kit to Learn On

CYANFOUR 4-Stage Kit

$14

Teaches 38 stitches in stages — you finish knowing the craft, not one design.

Fast Results (3 Projects)

Uphome 3-Pack Stamped

$13

Design pre-printed on the fabric — just stitch the lines. The fastest win.

The Color Palette

100-Color Floss Set

$9

100 colors of 6-strand cotton — never stuck without the right shade.

Best Beginner KitOur Pick

Type

Staged learning kit

Teaches

38 stitches, 4 progressive stages

Includes

Hoop, fabric, floss, needles

Best

Genuinely learning to embroider

Pros

  • Teaches 38 stitches progressively
  • You finish knowing the craft
  • Everything included to start
  • Excellent value for the learning

Cons

  • Starter-grade materials
  • Practice designs, not showpieces
  • You'll upgrade supplies after

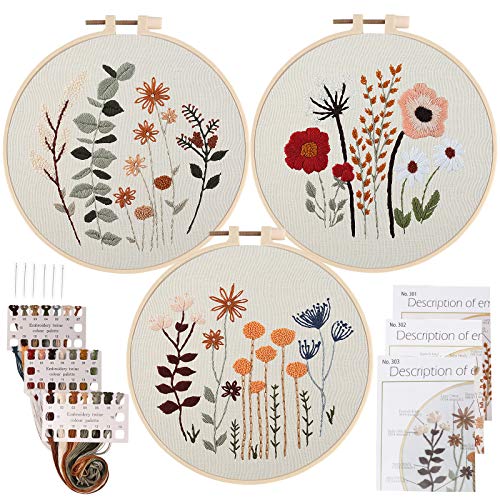
Most embroidery 'kits' hand you one pretty pattern and a bag of thread, and you finish having learned to copy exactly one design. This one is built differently: four progressive stages that teach 38 stitches in sequence, so you come out the other side actually knowing how to embroider — able to read any pattern and pick your own stitches. Everything's in the box (hoop, fabric, pre-sorted floss, needles), so there's nothing to source.

Why "learn the stitches" beats "finish one picture": embroidery is a vocabulary of stitches — back stitch, satin, French knots, lazy daisy, stem stitch — and once you know a dozen, you can make anything. A kit that teaches the vocabulary gives you a craft; a kit that's just one printed pattern gives you a single afternoon. This is the former.

It's a teaching kit, so the materials are starter-grade and the designs are practice-oriented rather than frame-worthy showpieces. That's exactly right for learning — and once you've worked through the stages, the better floss, hoops, and fabric below let you make pieces worth hanging. Start here to build the skill.

Our Pick

The kit that actually teaches you. Instead of one pretty pattern, it's structured in four progressive stages that walk you through 38 stitches — so you finish knowing how to embroider, not just how to copy one design. Everything's included: hoop, fabric, floss, and needles.

Buy this if you want to truly learn embroidery, not just complete a single picture. The staged, stitch-by-stitch structure builds real skill (38 stitches!), and with everything in the box you can start the day it arrives. The best teaching kit for a genuine beginner.

What we don't like

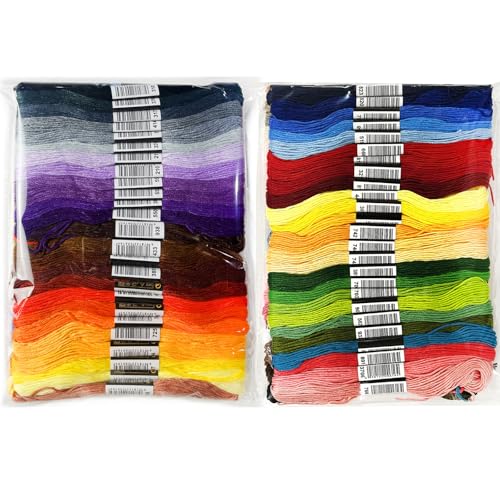
It's a learning kit, so the materials are starter-grade and the designs are practice-focused rather than wall-art showpieces. Once you've worked through it, you'll buy better floss, hoops, and fabric in bulk (all below) and design your own pieces.

Best Guided Kit (with Video)Also Great

Type

Video-guided beginner kit

Includes

Materials + 4K video + needle minder

Best

Visual learners, total beginners

Note

One project's stitch set

Pros

  • 4K video tutorials to follow along
  • Most beginner-proof start
  • Includes a handy needle minder
  • Great confidence-builder

Cons

  • Single-project stitch range
  • Needs screen access for videos
  • Less breadth than a staged kit

Some people learn a stitch from a diagram; many more learn it by watching someone's hands. This kit is built for the second group — it pairs the materials with 4K video tutorials, so you follow each stitch on screen instead of decoding a printed illustration. For a true never-touched-a-needle beginner, that visual hand-holding is the difference between finishing a piece and giving up halfway.

It also tosses in a magnetic needle minder — a small magnet that holds your needle to the fabric so it doesn't vanish into the couch, a small thing experienced stitchers swear by. The trade-off versus our top pick is breadth: you learn the stitches this project uses rather than a full progressive curriculum. If you're a visual learner who wants maximum guidance on a first piece, though, this is the gentlest possible on-ramp.

Also Great

For anyone who learns better by watching. This kit pairs the materials with 4K video tutorials and a magnetic needle minder — so you follow along on screen rather than puzzling over a diagram. The most hand-held start for a complete beginner who's never held a needle.

Buy this if printed instructions intimidate you and you'd rather watch someone do each stitch. Video tutorials remove the guesswork from a first project, and the included needle minder (a magnet that holds your needle so it never gets lost) is a genuinely useful touch.

What we don't like

Like any single-project kit, you learn the stitches that design uses rather than a full progressive curriculum (the CYANFOUR kit teaches more breadth). And you'll need internet/screen access to follow the videos.

Best Value (Multi-Project)Best Value

Type

Stamped kits (3 pack)

Why

Design pre-printed — just stitch

Best

Fast results, value, groups

Note

Fixed printed designs

Pros

  • Three projects, very low price
  • Stamped = no design transfer needed
  • Fast, satisfying finished pieces
  • Great for groups and gifting

Cons

  • Locked to the printed designs
  • Faint lines can show if undercovered
  • Not a skills curriculum

The single most intimidating step for a beginner — getting a design onto the fabric — disappears with a stamped kit. 'Stamped' means the pattern is pre-printed onto the cloth, so you simply stitch over the printed lines. No transferring, no drawing, no counting — just follow the picture. It's the fastest route to a result that actually looks good, which is exactly what keeps a beginner going.

Three projects in one pack make it superb value and ideal for a craft night, a set of gifts, or stitching alongside friends or kids. The trade-offs are creative: you're locked to the printed designs (no freestyling yet), and if your stitches don't fully cover the lines, faint marks can show. Use it as a confidence-builder for fast wins, and pair it with the stitch-teaching kit above to build real skill alongside the quick results.

Best Value

Three projects for the price of one, with the design already printed on the fabric. 'Stamped' means the pattern is pre-printed so you just stitch over the lines — the easiest way to get a good-looking result fast. Three designs means three finished pieces or three people stitching together.

Buy this for the most beginner-friendly value: stamped fabric removes the hardest beginner step (transferring a design), and three projects make it great for a craft night, gifts, or stitching with friends or kids. The fastest path to a finished, framable piece.

What we don't like

Stamped patterns lock you into the printed designs (no creative freedom yet), and you may see faint pattern lines if your stitches don't fully cover them. It's a confidence-builder, not a skills curriculum — pair it with the learning kit above.

The HoopsEssential

Type

Bamboo embroidery hoops

Sizes

7 hoops, 4"–12"

Why

Tension = clean stitches

Best

Every project + display

Pros

  • Seven sizes for any project
  • Keeps fabric drum-tight
  • Double as finished-piece frames
  • Excellent value

Cons

  • Can loosen in long sessions
  • Re-tighten / bind with twill tape
  • Basic (not no-slip)

If one thing separates clean embroidery from puckered, uneven embroidery, it's hoop tension. The hoop's whole job is to hold your fabric drum-tight, like a snare drum, so your stitches lie flat and even instead of distorting the cloth. A set of seven sizes (4" to 12") lets you match the hoop to your design and keep that tension across any project — and beginners always outgrow the single hoop a kit includes.

Tension tip: tighten the top screw, then gently pull the fabric edges taut all the way around until it's tight as a drum. If a hoop slips during long sessions, wrap the inner ring with twill tape for grip. Drum-tight fabric is the foundation every clean stitch is built on.

Bamboo hoops have a bonus life: leave the finished piece in the hoop, trim the back, and you've got an instant round frame — the classic embroidery-as-wall-art look. Cheap, essential, and you'll use every size.

Essential

The frame that holds your fabric drum-tight — and tension is everything. A range of seven sizes (4" to 12") lets you match the hoop to each project and keep the fabric taut, which is the single biggest factor in clean, even stitches. Bamboo hoops also double as frames for finished pieces.

Buy these as your core hardware. A taut hoop is what makes stitches lie flat and even; a loose one puckers everything. Seven sizes mean the right fit for any design, and a beginner quickly wants more than the one hoop a kit includes. They're cheap and double as display frames.

What we don't like

Basic wood hoops can loosen during long sessions (re-tighten the screw, or bind the inner ring with twill tape for grip). For heirloom work some prefer a no-slip hoop, but for nearly everything, these are all you need.

The FlossEssential

Type

6-strand cotton floss

Count

100 colors, center-pull skeins

Why

Your full color palette

Best

Any pattern; value

Pros

  • 100 colors — stitch anything
  • 6-strand: split for fine or bold
  • DMC-style numbering for patterns
  • Pennies per skein

Cons

  • Not genuine DMC quality
  • Slightly less consistent sheen
  • Buy real DMC for heirlooms

Embroidery floss is your paint, and a big set means you never stall for want of a color. This 100-color set of 6-strand cotton covers virtually any pattern, and the skeins use DMC-compatible numbering so you can follow standard patterns that call out specific thread colors.

What "6-strand" means: each length of floss is six fine strands twisted together, and you separate them to control your line weight — stitch with all six for bold, satin-filled areas, or pull out two or three for fine detail and delicate lines. Learning to split floss is a core early skill, and it's why one set of thread does so many jobs.

Generic floss isn't quite genuine-DMC quality — the sheen and colorfastness are a touch less consistent — so for a true heirloom piece you'd reach for real DMC skeins. But for learning and the overwhelming majority of projects, a 100-color budget set is the fastest, cheapest way to a complete palette.

Essential

A full palette to stitch anything. 100 colors of 6-strand cotton floss means you're never stuck without the right shade, and DMC-compatible numbering lets you follow standard patterns. The thread is the paint of embroidery — and a big set is the cheapest way to a complete palette.

Buy this so color is never the thing stopping you. A 100-color set covers virtually any pattern, the 6-strand floss separates for fine or bold work, and at this price it's a fraction of buying skeins individually. The complete palette every stitcher wants on hand.

What we don't like

Generic floss isn't quite DMC-brand quality (slightly less consistent sheen and colorfastness), so for an heirloom piece you'd buy genuine DMC. For practice and the vast majority of projects, a big budget set is the smart buy.

The NeedlesEssential

Type

Large-eye sharp (crewel) needles

Count

Assorted sizes

Why

Easy threading + clean piercing

Best

Surface embroidery

Pros

  • Large eye — easy to thread floss
  • Sharp point pierces woven fabric
  • Assorted sizes for any thread
  • Cheap — buy plenty of spares

Cons

  • Sharp = for surface embroidery
  • Cross-stitch wants blunt tapestry needles
  • Tiny — easy to lose

A surprising amount of beginner frustration is just the wrong needle. Embroidery (crewel) needles are made for the job: a large eye that's easy to thread even with several strands of floss, and a sharp point that pierces woven fabric cleanly. An assorted-size pack lets you match the needle to your thread thickness and fabric — finer needles for detail, larger for heavy floss.

One distinction worth knowing: sharp embroidery needles are for surface embroidery on plain woven fabric, while counted cross-stitch on aida uses blunt tapestry needles that slip between the grid holes without splitting threads. They're different tools for different techniques — both are a couple of dollars, so if you do both crafts, keep both on hand. Either way, buy a multipack: needles bend, dull, and have a way of vanishing into the sofa.

Essential

The right needle makes threading and stitching effortless. Embroidery needles have a large eye (easy to thread with multiple floss strands) and a sharp point (to pierce woven fabric). An assorted-size set covers everything from fine detail to heavy floss. Cheap, and you'll lose plenty.

Buy these so threading isn't a fight. A large-eye sharp embroidery (crewel) needle takes several strands of floss easily and pierces fabric cleanly — assorted sizes let you match needle to thread and fabric. You always need spares (needles bend and disappear), so a multipack is sensible.

What we don't like

Sharp embroidery needles are for surface embroidery on woven fabric; counted cross-stitch on aida uses blunt tapestry needles instead (different tool). Match the needle to your technique — both are cheap, so own both if you do both.

Austin Art Insider

Free weekly guide to galleries, exhibitions & collecting in Austin.

The FabricAlso Great

Type

14-count aida cloth

Size

59" × 39" (cuts to many)

Best

Counted cross-stitch

Note

Surface embroidery wants plain cotton/linen

Pros

  • Even grid = foolproof cross-stitch
  • Clear holes, easy counting
  • Big piece, low cost per project
  • Classic 14-count beginner weave

Cons

  • Only for counted cross-stitch
  • Surface embroidery wants plain weave
  • Visible grid (must be covered)

The fabric you choose depends on which craft you're doing — and getting it right matters. This is 14-count aida: a stiff, evenly woven fabric with a clear grid of holes, designed for counted cross-stitch, where you place uniform X-shaped stitches by counting squares from a chart. That regular grid is what makes cross-stitch so beginner-friendly — even stitches almost happen automatically. A large 59"×39" piece cuts down into many projects for far less than pre-cut squares.

Crucial distinction: aida is for counted cross-stitch. For freestyle surface embroidery (drawing with stitches in any direction), you want a smooth, tightly woven plain cotton or linen instead — the aida grid would get in your way. Match the fabric to the technique: grid for cross-stitch, plain weave for freeform. See the FAQ below on embroidery vs cross-stitch if you're not sure which you're doing.

Also Great

The gridded fabric that makes counted cross-stitch easy. 14-count aida has an even, visible weave with clear holes, so you place uniform X-stitches by counting squares — the most beginner-friendly fabric for counted work. A large 59"×39" piece cuts down to many projects.

Buy this if you're doing counted cross-stitch (the X-stitch pixel-art style). Aida's regular grid makes placing even stitches almost foolproof for beginners. The big piece is far cheaper per project than pre-cut squares. (For freestyle surface embroidery, see the fabric note below.)

What we don't like

Aida is specifically for counted cross-stitch — for freestyle surface embroidery you want plain, tightly woven cotton or linen instead (a smooth surface you can stitch in any direction). Match the fabric to your craft; aida's grid is a help for cross-stitch and a hindrance for freeform.

The ScissorsAlso Great

Type

Precision embroidery scissors

Size

4", fine sharp tips

Why

Clean snips, close trims

Best

Thread only — keep them sharp

Pros

  • Razor-fine tips for clean snips
  • Trim close without nicking work
  • Forged stainless, holds an edge
  • Cheap craft essential

Cons

  • Delicate tips (don't drop)
  • Thread only — paper dulls them
  • Small (easy to misplace)

You'll reach for scissors constantly — and ordinary ones make embroidery harder than it needs to be. Dedicated embroidery scissors are small, with fine, razor-sharp points that cut floss cleanly (a clean cut threads far easier than a frayed one) and let you trim right at the fabric surface without nicking the stitches you just made. It's a small upgrade you feel every session.

One rule keeps them perfect: use them only for thread. Cutting paper, tape, or fabric backing dulls fine tips fast, so guard your embroidery scissors the way a chef guards a good knife. Treated that way, a $10 pair stays surgically sharp for years. Just don't drop them — the delicate points can bend.

Also Great

Tiny, sharp, and pointed — for clean thread snips right at the fabric. Dedicated embroidery scissors have fine, razor-sharp tips that cut floss cleanly and let you trim close without nicking your work. A small thing that makes every session tidier; keep them only for thread.

Buy a pair and guard them. Sharp, fine-tipped embroidery scissors snip floss cleanly (frayed cuts are a pain to thread) and trim tight to the fabric without cutting your stitches. Using them only for thread — never paper — keeps them sharp for years.

What we don't like

Fine tips are delicate — drop them and the points can bend. And it's tempting to use them for everything; resist, because paper and tape dull them fast. Otherwise, at this price, there's nothing to fault.

The Stand (Upgrade)Upgrade Pick

Type

Adjustable hoop stand

Material

Beech wood, rotating

Why

Two-handed stitching, comfort

Best

Longer sessions, bigger pieces

Pros

  • Frees both hands to stitch
  • Faster, neater, proper technique
  • Easy on wrists and neck
  • Adjustable angle + rotation

Cons

  • More than a first project needs
  • Setup and desk space
  • An investment vs the cheap basics

There's a reason serious stitchers don't hold the hoop in their hand: a stand lets you use both hands, and two-handed stitching changes everything. With the hoop held steady on an adjustable stand, you guide the needle down with one hand and back up with the other — faster, more even, and the technique that makes detailed work and smooth filling far easier.

The comfort dividend is just as real: holding a hoop one-handed cramps your grip and hunches your neck within minutes, while a stand keeps the work at a comfortable angle so an hour disappears pleasantly instead of painfully. It's an upgrade, not a starter buy — a first small project doesn't need it, and it takes some space and setup. But the moment you're stitching longer or working larger pieces, a hands-free stand is what turns embroidery into the relaxing craft everyone says it is.

Upgrade Pick

Both hands free, no more aching grip. An adjustable stand holds your hoop at any angle so you can stitch with both hands — faster, neater, and far easier on your wrists and neck during long sessions. The upgrade that turns embroidery from tiring to genuinely relaxing.

Buy this once you're hooked and sitting for longer sessions. Holding a hoop in one hand limits you to one-handed stitching and cramps up fast; a stand frees both hands (one above, one below the fabric), which is faster and the proper technique. A real comfort and quality upgrade.

What we don't like

It's more than a casual beginner needs for a first small project, and it takes setup and space. But the moment you're stitching for an hour-plus or working larger pieces, two-handed stitching on a stand is transformative.

Head-to-Head

How the top picks compare

The two questions every embroidery beginner faces — which craft, and kit or separates. Here's how to decide.

Surface Embroidery vs Cross-Stitch

Freestyle creativity, or counted, gridded, foolproof neatness.

Plain fabric + sharp needle

Winner

Surface Embroidery

Creative freedom, any design

Check Price →

Aida + blunt needle

Counted Cross-Stitch

Foolproof, neat, paint-by-numbers

Check Price →

Our verdict

Winner: Plain fabric + sharp needle Surface Embroidery. Neither is 'better' — they're different crafts, and the right start depends on you. Surface embroidery wins for creative freedom: you stitch in any direction on plain fabric with a whole vocabulary of stitches, so you can draw and fill your own designs — more open-ended and, we'd argue, more rewarding long-term. Cross-stitch wins for guaranteed-neat, low-stress results: the aida grid and counted X-stitches make even, tidy work almost automatic, which is wonderfully relaxing and beginner-proof. Pick surface embroidery if you want to create freely and learn many stitches; pick cross-stitch if you want structured, paint-by-numbers calm. Just match your fabric and needles to the choice — and many people happily do both.

Buy the Plain fabric + sharp needle

you want creative freedom and varied stitches.

Buy the Aida + blunt needle

you want structured, foolproof, relaxing stitching.

All-in-One Kit vs Building Your Own

Everything matched to learn on, or better supplies you choose.

CYANFOUR

Winner

Complete Kit

Teaches stitches, all included

$14
Check Price →

Hoops + floss + needles + fabric

Build Your Own

Better supplies, your designs

~$50+
Check Price →

Our verdict

Winner: CYANFOUR Complete Kit. For a first project, the kit wins — everything's matched and included, and a stitch-teaching kit builds real skill without any sourcing or guesswork, all for around $14. Build your own once you know you love it: a range of hoop sizes, a full 100-color floss palette, quality needles and your choice of fabric give you the freedom to stitch your own designs and the comfort of a hoop stand for long sessions. The natural path is to learn on a kit, then build out your supply kit as your skills and ambitions grow — exactly the order this guide follows.

Buy the CYANFOUR

you're brand new and want to learn the stitches.

Buy the Hoops + floss + needles + fabric

you're ready to stitch your own designs in comfort.

How we
chose

We assembled this the way an experienced stitcher would equip a beginner — a kit that teaches, the right supplies, and the technique that matters:

  • Learn the stitches, don't just copy one. We led with a staged kit that teaches 38 stitches, because a vocabulary of stitches is what lets you make anything — far more useful than finishing a single printed pattern.
  • Embroidery vs cross-stitch, made clear. The biggest beginner confusion. We flagged it everywhere it matters — fabric (plain weave vs aida grid) and needles (sharp vs blunt) — so you buy the right tools for your craft.
  • Tension is everything. We stressed the hoop's real job — holding fabric drum-tight — because it's the single biggest factor in clean stitches, and included a range of sizes.
  • 6-strand floss, explained. We covered splitting floss to control line weight, the core early skill, and chose a 100-color set for a complete palette.
  • Comfort scales with commitment. Sharp scissors and a hands-free stand are the upgrades that make longer sessions faster and pain-free — we said clearly when you actually need them.

Share this guide

Share

Common Questions

Frequently Asked Questions

Have art
to sell?

Austin Gallery specializes in selling inherited art, estate collections, and fine art with zero upfront fees. Get a free evaluation today.