Walk into a frame shop with a print you love and you will walk out lighter by $150, sometimes $300, for a single piece. It can feel like paying for a secret, and in a way you are. Framing looks like a specialized craft because it is one. There is a real order to it, a handful of purpose-built tools, and a set of small tricks nobody hands you unless you have stood at the bench and done it a few hundred times.
We have. At the gallery we frame constantly, everything from a delicate paper print to a client's inherited oil, and the thing we end up telling people most often is this: the craft is real, but it is not out of reach. Once you own the tools, every frame after the first costs only its materials, usually $15 to $40. The bench pays for itself in a handful of pieces, and then it just keeps saving you money for the rest of your life.
So here is the entire process, exactly the way we run it, with every one of those little tricks left in. Follow it start to finish and you can frame anything: a poster, a photograph, a watercolor, a diploma, a record cover you finally want off the shelf and onto the wall. And the best part, the part that surprises almost everyone the first time they hear it, is that the professional look does not come from a flawless cut. It comes from knowing how to hide the imperfect one. Hold onto that. It is the whole secret.
Step 1: Start with the art and measure backward
Everything begins with the piece itself, not the frame. Lay the art down and decide how much of its edge you want the mat to cover. We leave about a quarter inch, so the mat laps gently over the border of the print instead of meeting it exactly. That small overlap is what actually holds the art in place, and it keeps a sliver of bare paper from peeking out if anything ever shifts.
Then choose your mat margin, the open band of mat between the art and the frame. Wider reads more like a gallery; two to three inches is a safe, elegant default. Add those numbers together, and remember the one detail almost everyone forgets: the frame's rabbet, the little lip on the back of the molding that laps over the front of your glazing. The frame opening has to account for it or the whole package will not seat correctly. Measure once here, and measure slowly. Every cut that follows depends on getting these few numbers right.
Step 2: Cut the corners, and dry-fit before you commit
A picture frame is four 45-degree miters meeting at the corners, and miters are honest joints: they show every mistake. A fraction of a degree off at the saw turns into a visible wedge of daylight at the seam. A miter saw fitted with a fine, high-tooth finish blade cuts them cleanly with no tear-out, and a digital angle gauge lets you confirm the blade is sitting at a true 45 before you commit a single piece of molding.
Cut your two long legs and two short legs, then dry-fit the whole frame on the bench before a drop of glue comes out. This is your last free look. If a corner gaps, you want to find out now, while you can still shave it, not after it is glued shut.
One honest word, because we would rather you hear it from us than be surprised: a home saw with a hobby blade flexes a hair, and your corners will not be quite as tight as a professional shop's. That is completely fine. We close those gaps invisibly at the very end, and you will not believe how well it works. Cut to the best of your tool's ability and keep moving.
Step 3: Join the corners so the seam disappears
Glue first, always. A good wood glue soaks into the open grain of a fresh miter and forms a bond stronger than the wood around it, so let the glue do the real holding. Bring the corner together, hold it square with a corner clamp or a band clamp cinched around all four sides at once, and if you are impatient by nature you can add a small dab of super glue to grab while the wood glue cures.
Here is a trick worth its weight. If your molding is stained or finished, the fresh cut exposes pale raw wood right at the seam. Before you close the joint, color that cut edge with a matching wood touch-up marker. Now, even if the miter is not perfect, there is no bright line of bare wood to give it away. It is a ten-second habit that quietly saves a lot of corners.
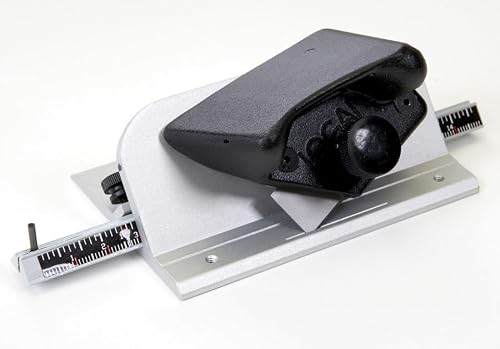
Glue holds for a while; it does not hold forever. To make the corner permanent and invisible, you drive a v-nail, a small fastener shaped like a V, up into the back of the joint. It works like a staple pulling the two halves together, and it never shows from the front. Frame shops fire these in with a pneumatic underpinner the size of a small appliance, a machine that costs thousands and needs its own air compressor. You do not need any of that. A manual joiner presses the same v-nail home with a single pull of a lever, quietly, on your bench, for a tiny fraction of the price.
Step 4: Cut the mat, and why acid-free is never optional
The mat is what makes a framed piece look considered instead of shrink-wrapped. It gives the art room to breathe, and it quietly does a structural job too: it holds the glazing up off the surface of the art. That little gap matters far more than it sounds. Press glass straight onto a photograph and, in any humidity, the emulsion can bond to the glass and destroy the print. The mat is the spacer that prevents it.
The detail that separates a homemade mat from a professional one is the bevel, the clean angled cut around the window that reveals a crisp white edge. You cannot get that with a craft knife and a steady hand; it takes a mat cutter with an angled blade riding a guide. It is the single most transformative tool in this whole kit, and if you want to see how the tabletop and handheld options stack up we lay it all out in our guide to the best mat cutters.
And use acid-free, archival board. This is the one place we will not bend. Ordinary matboard carries acid and lignin, and over the years it yellows and burns a brown halo into whatever it touches. We see it all the time: an older print comes across the bench and there is a stained rectangle exactly where a cheap mat once sat. It can take a decade to show, but it is permanent, and if a piece is worth framing, it is worth protecting with proper acid-free mat board.
Step 5: Build the sandwich, and win the war on dust
Now you assemble what we call the sandwich: a backing board on the bottom, the art resting on it, the mat over the art, and the glazing on top. Mount the art to the backing with archival corner pockets, never with glue or tape on the art itself, so the piece is held securely but can always slide right back out untouched years from now.
For glazing, acrylic is the home framer's best friend: lighter than glass, shatterproof, and easy to cut to size yourself (if you are torn between the two, we weigh it out in acrylic versus glass). It does have one quirk. The instant you peel off its protective film it throws a static charge and reaches out for every speck of dust and stray hair in the room. Work clean, keep your fingers off the face of it, and clear the surfaces with a few puffs from a rubber air blower. Do not reach for canned air up close, which can spit propellant onto the art, and never, ever hit archival materials with glass cleaner. You would be pumping the exact chemicals back in that you just paid to keep out.
Here is our favorite secret in the entire process. You will seal everything up and then spot one stubborn fleck of dust trapped under the glazing, right in the open mat. Do not open the whole thing back up and invite ten new specks in. Instead, take a small piece of tape, hold it sticky side up, and slide it under just that corner until it touches the fleck and lifts it out. The first time it works, it feels like a magic trick.
Step 6: Secure it, then seal the back like a shop
Set the frame face-down over the sandwich and drive framing points into the inside edge of the molding to press everything tight toward the front. Rigid points are permanent; flexible points bend out of the way if you ever want to reopen the frame, which is exactly what you want for a diploma or anything you might reframe someday. It is a genuinely satisfying step, each point seating with a soft click.
Then finish the back the way a shop does. Stretch a sheet of kraft dust-cover paper across it, tack it down with acid-free ATG tape, and trim it flush. That sealed brown back does two jobs. It keeps dust out for good, and it is the quiet detail that tells anyone who ever flips the piece over that it was framed by someone who cared.
Step 7: Hang it, then work the real magic
Screw a pair of D-ring hangers into the back a few inches down from the top, string coated wire between them with a little slack, and press a rubber bumper onto each bottom corner so the frame hangs flat, level, and just off the wall. Pull the wire taut, measure from it to the top of the frame, and you will know exactly where your nail needs to land.
And then comes the payoff we promised you at the very start. Remember those imperfect corners? Take a small tin of nail-hole and corner filler wax, a soft wax that never fully hardens and comes in every wood tone and metal finish, and rub a touch into each gap. Wipe the excess away and the seam simply vanishes. This is the moment. A corner that looked homemade a second ago now looks like it walked out of a shop, and it is the honest reason we can tell you not to spend $600 on a saw. You are not buying a perfect cut. You are buying the wax that forgives an imperfect one.
That is the whole craft, from the first measurement to the last swipe of wax. Below is every tool and material it takes, grouped from the core machines you buy once to the consumables and small finishing touches you will restock. Set the bench up a single time, and the next frame, and every frame after it, is yours to make.
A quick, honest note: some links in this guide are affiliate links, so if you buy through them the gallery may earn a small commission at no extra cost to you. It never changes what we recommend. See our full disclosure.